Given the economy, “Money doesn’t grow on trees” may be a familiar saying in your household, but it doesn’t hurt to remind your child how much we rely on forests for other needs, including that school-supply staple paper. According to the EPA, the average American uses the equivalent of a 100-foot Douglas fir tree in paper and paper products annually. Help your child make the connection between conserving natural resources and recycling by introducing her to the art of papermaking.
Explain to her that paper sheets contain different amounts of wood pulp — paper with a high “bond number” has more pulp — and that the pulp is made up of shorter or longer cellulose fibers (which can be viewed with a microscope or hand lens). Every time paper is recycled, the fibers get shorter, and after being recycled five to seven times, the fibers become too short and brittle. By turning old scraps into homemade paper, your child will not only extend the life of discarded Post-Its, paper towels, and magazines, but she’ll also create a uniquely textured material perfect for greeting cards, bookmarks, and other crafty gifts.
What you’ll need
- Paper towels (unused)
- Construction or other colored paper, flower petals, pine needles, spices, magazine pictures, or bits of fabrics to make interesting-looking or scented paper
- A blender
- A mold and deckle (a frame that holds the pulp in place and shapes the paper — you can buy this at a crafts store or make a simple one with two embroidery hoops and some nylon window screen; see instructions below.)
- A dishpan or water-tight tub
- A sponge
- Wax paper
How to do it
Reuse old scraps to make paper from scratch and, in the process, add homemade flair.
- Tear several paper towels into strips, and put them in a blender three-quarters full of water. Add any optional materials to give your paper a unique color or scent and blend on high for about a minute (the longer you blend, the shorter the fibers will become).
- Pour the mixture into your tub. Repeat until you have at least a couple inches of pulp. Stir the mixture.
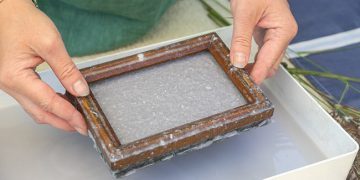
- Fit the deckle (the open hoop) over the mold (the netted hoop), sandwiching the netting in between. Dip the mold and deckle into the tub with the screen facing up. Scoop up a layer of pulp, making sure to hold the deckle steady on the mold. Holding the deckle and mold parallel to the basin, lift them quickly several times to shake out excess water.
- Remove the deckle, cover the mold with a piece of wax paper and turn it over onto a flat surface. Soak up excess water with your sponge through the screen.
- Allow the paper to dry completely (usually overnight). You can speed up the process and make your paper flat by pressing it onto a sunny window and peeling off the wax paper.
How to make a mold and deckle
What you’ll need
- Two small embroidery hoops
- Nylon window screen
How to do it
Cut a piece of screening at least two inches larger all around than your hoops. Separate the two parts of one of the hoops and stretch the screen over the inner one tightly. Secure it with the outer hoop, just as you would a piece of fabric for embroidering. This hoop is now the mold, and the unscreened hoop is the deckle.
Adapted from an activity designed by Dr. Fred Stein, a science educator at the Exploratorium Institute for Inquiry, a national science-education-reform project based in San Francisco.